

|
| ||||||||||||||||||||||||
How can I create Windows XP icons using Adobe Photoshop?Microsoft® Windows® XP introduces a new style in icon design. The Windows XP icon style is all about fun, color, and energy—and, as there are now 32-bit versions of the icons, smooth edges.Icon Design OverviewThis section will familiarize you with the new Windows XP style in preparation for creating your icons.Icon Style CharacteristicsIcon SizesMicrosoft recommends that your icon contains these three general sizes:
Icons on the left side of the Start menu are displayed at the 24 x 24 pixels size. This is not a size that you need to provide usually.  If you are creating icons for a toolbar, the Windows standard sizes are 24 x 24 and 16 x 16 pixels.  Icon Color Depth SupportEach Windows XP icon should contain these three color depths to support different monitor display settings:
You should have a total of nine image formats — three sizes per color depth:
Color PaletteThese are the primary colors that are used in Windows XP 8-bit icons:
To load this palette into ArtIcons Pro icon editor, select the Effects\ Palette\ Predefined \Windows XP item from the main menu. Angle and Grouping of ObjectsThis is the perspective grid that Windows XP style icons use:
Not all objects work well at 16 x 16 at an angle. The following objects are usually shown in a straight-on manner: 
Create overlapping secondary objects at an angle unless it makes more sense, due to readability and integrity, that they are rendered straight on. Consider also how your icons may be viewed as a set to help determine how to group objects. 
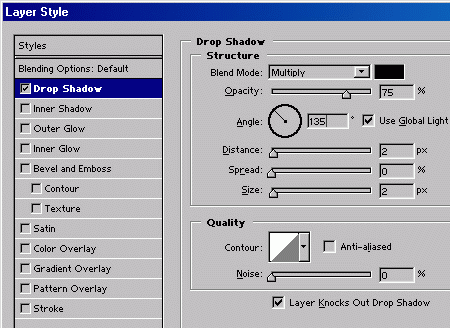
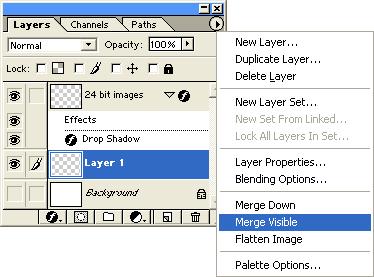
Drop ShadowWindows XP icons use a drop shadow to provide definition and added dimension. This effect is supported by Aha-Soft ArtIcons. To add the drop shadow to your images, select the Effects / Drop Shadow item from the main menu.IllustrateYou may use a vector tool (such as Macromedia FreeHand or Adobe Illustrator) to illustrate Microsoft Windows XP style icons. Use the palette and style characteristics as outlined in the Icon Design Overview.1. Illustrate your image using FreeHand or Illustrator. 2. You will need three sizes of the image. Because there will be a drop shadow added to the image later, you should create three sizes that are around 46 x 46, 30 x 30, and 14 x 14 pixels. 3. Copy and paste the vector images into Photoshop as pixels (bitmap). Creating the 32-bit imagesAfter pasting your vector files into Photoshop, the next step is to finalize the 32-bit images.1. Once you've pasted your three sizes into Photoshop, check the readability and resolution of your images, especially at the 16 x 16 size. You may need to do some pixel-pushing. If the 16 x 16 is not reading clearly, consider going back to FreeHand to simplify the image at that size. 2. Add the drop shadow to your images by double-clicking on the image's layer and selecting Drop Shadow. Then change Angle to 135, Distance to 2, and Size to 2. The drop shadow is black at 75% opacity.  3. To merge the drop shadow and the 24-bit images, create a new blank layer. In the Layers menu, select Merge Visible and merge the three layers.  4. Create three new Photoshop files, one for each size: 48 x 48, 32 x 32, and 16 x 16 pixels. Copy and paste the appropriate image. If an image's drop shadow gets cropped, you should go back to FreeHand, scale down the image, and follow the steps again. 5. Save each file as a .psd file. Do not merge the image layer with the background layer. It's helpful to include the size and color depth in the file name. 6. Make a new icon with ArtIcons Pro (Main menu\File\New Icon). 7. Add PSD images to this icon (Tools\Add Image). 8. Delete the first empty image from this icon (Tools\Delete Image Format). 9. After importing your images into ArtIcons Pro, check their readability and resolution, especially at the 16x16 size. You may need to do some pixel-pushing. If the 16 x 16 is not reading clearly, consider simplifying the image at that size. 10. Duplicate every 32-bit image format in this new icon for future creation of 8-bit images. Convert the copies into 8-bits (Main menu\Tools\Convert Image Format). Creating the 8-bit imagesNow that you have the 8-bit images ready already, you need to correct them. The 8-bit versions will not have the 8-bit alpha channel, so they will need to have their edges cleaned up as there's no antialiasing (that is, their edges will be jagged).Clean up the edges with Pencil tool, removing any antialiased pixels. Check your image on both light and dark background (right-click the icon image in the preview window to bring up the context menu and select 'List Color' item). Creating the 4-bit imagesIf you want your icons to look good on bottom-level systems, provide 16-color versions of your icon.1. Duplicate every 8-bit icon image format and convert copies to 4-bit color depth. 2. Clean up your images using the colors from the 16-color palette. 3. Use a black outline on the bottom and right edges of the image. 4. Use a dark gray or other dark color outline for the left and top edges of the image. FinalizingYou should have a total of nine image formats - three sizes per color depth in the next sequence:
Use Tools\Sort Image Formats\for Windows XP menu command to sort the icons in this sequence or arrange icons using drag-n-drop. This sequence is necessary for correct icons display on any system, not only Windows XP. To save the icon, select Main menu\File\Save as... | ||||||||||||||||||||||||
|
Icon Software | Graphic Software | Icons Downloads | Order Icons | Ready Icons
| Support
Privacy Policy | Terms of Use | Refund Policy Copyright © 2000-2022 Aha-Soft. All rights reserved. |
|